Most homeowners think a green yard starts at the faucet, but it actually begins on a piece of graph paper. It's frustrating to watch your water bills climb while brown spots still mar your grass. You've likely felt the headache of trying to calculate PSI and GPM, only to end up with a system that struggles against the intense Arizona heat. We understand that you want a landscape that thrives without wasting resources or your time. Mastering the technical principles of sprinkler system layout design allows you to create a professional-grade system tailored to our unique desert environment.
This guide provides the clarity you need to move from confusion to a precise, workable plan. We will cover the essentials of hydraulic math, the importance of correct head-to-head coverage, and how to map out irrigation zones that ensure every drop of water is used effectively. You'll learn how to build a layout that's durable enough to survive the summer while keeping your property healthy and your utility bills manageable. By the end of this article, you'll have a clear path toward a more efficient and reliable irrigation system.
Key Takeaways
- Precision in your sprinkler system layout design is the most effective way to lower water bills and prevent localized dry spots.
- Learn why calculating your property's working pressure and flow rate is a non-negotiable first step before installing a single pipe.
- Discover the principle of hydrozoning to ensure that your lawn and desert plants receive the exact amount of water they need without waste.
- Understand the technical requirement for head-to-head coverage to achieve a uniform application of water across your entire landscape.
- Gain insights into professional pipe sizing and valve placement to build a system that's easy to maintain and built for the long term.
Understanding the Foundations of Sprinkler System Layout Design
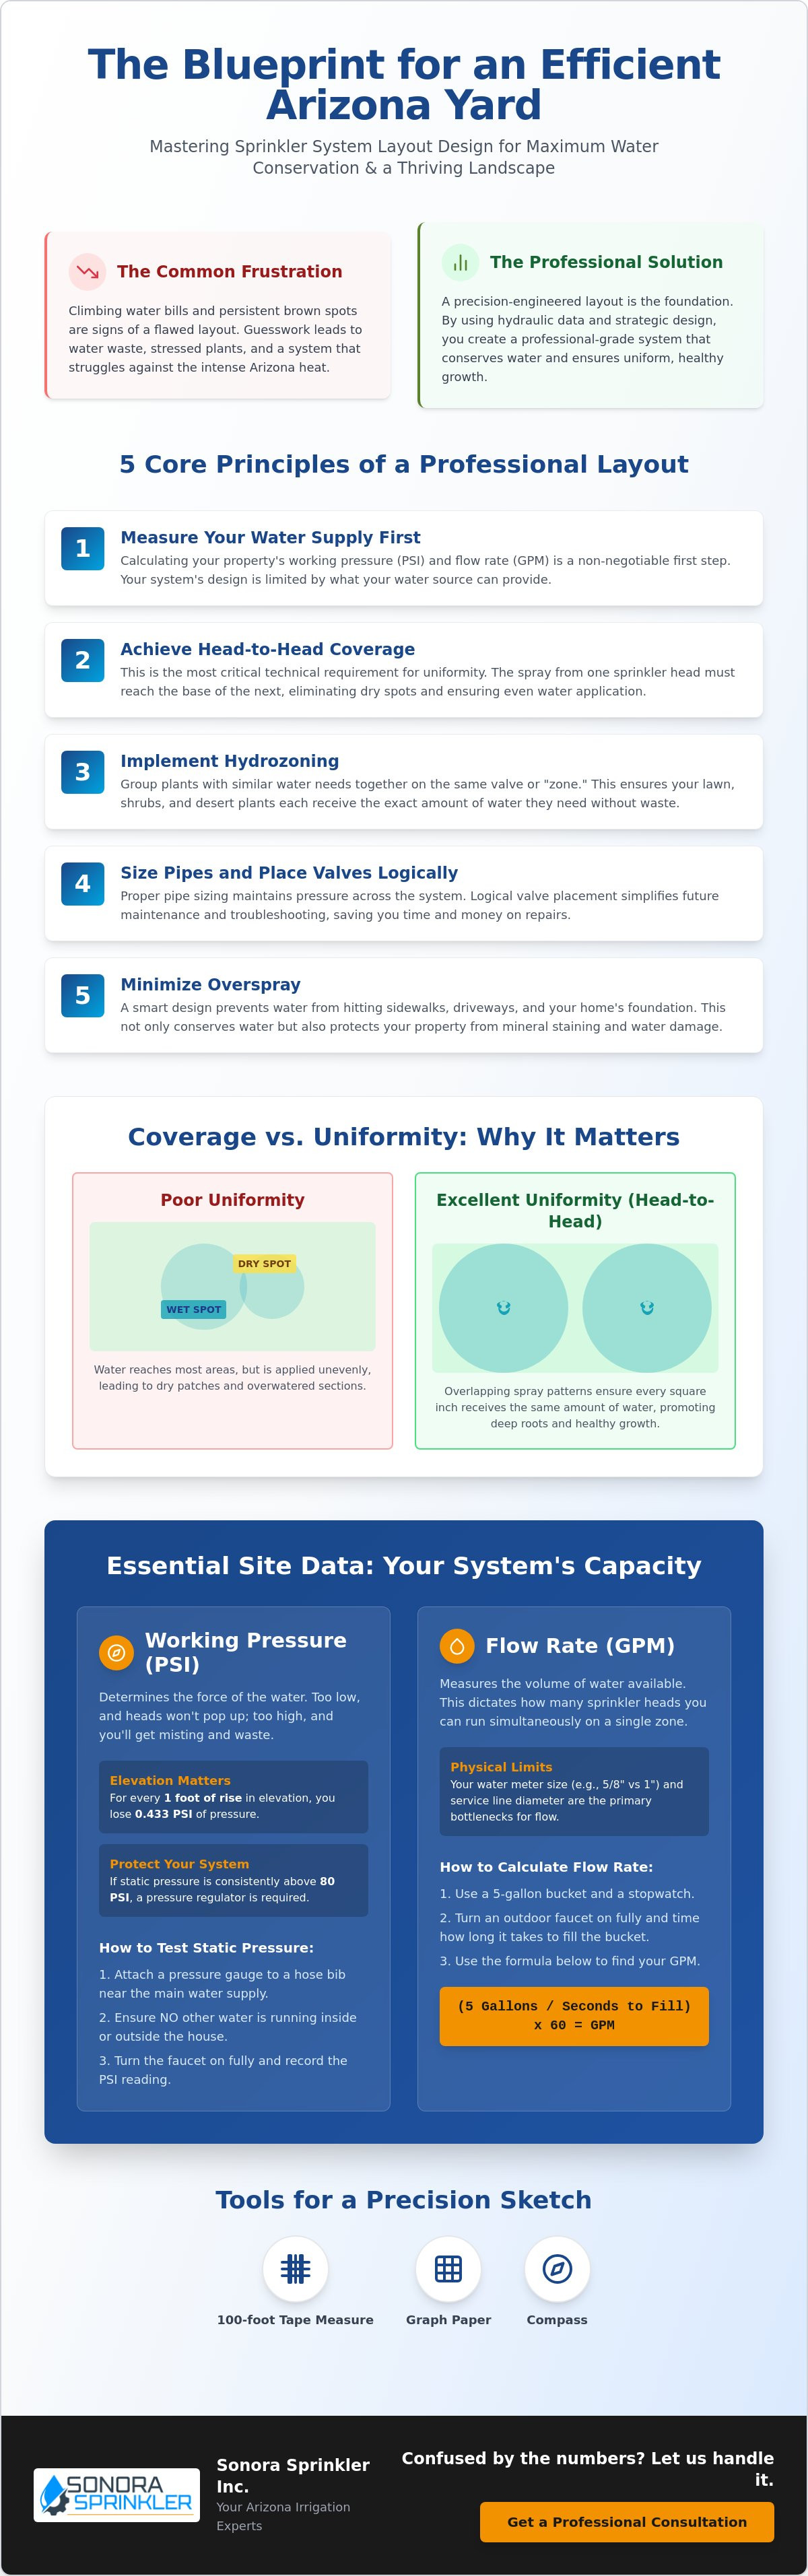
Sprinkler system layout design is the blueprint for how water moves across your property. It involves the calculated placement of heads and pipes to ensure every square inch of your lawn or garden receives moisture. In the Arizona desert, where evaporation rates are extreme, a design that's "close enough" isn't sufficient. Precision is the primary factor in residential water conservation because it prevents the waste associated with wind drift and runoff. If the layout is flawed, you'll likely see uneven growth and high water bills.
It's vital to understand the difference between coverage and uniformity. Coverage means water reaches an area, but uniformity ensures that water is applied at the same rate across the entire zone. A poor layout often creates "hot spots" where some plants drown while others wither. This imbalance forces you to overwater the whole yard just to keep one dry patch alive. It also places unnecessary stress on your valves and leads to low pressure at the furthest heads. There are various types of irrigation sprinklers that can be used, but their effectiveness depends entirely on the underlying design.
To better understand how geometry impacts your yard, watch this helpful video on head-to-head coverage:
The Core Objectives of a Professional Layout
A professional sprinkler system layout design prioritizes head-to-head coverage, which is the 100% overlap of spray patterns. This ensures that the base of one head is watered by the spray of the next, eliminating dry spots. Beyond coverage, a smart design minimizes overspray on sidewalks, fences, and home foundations. This protects your property from water damage and mineral staining. Finally, a clean layout simplifies future irrigation repairs and maintenance. When pipes and valves are placed logically, troubleshooting becomes faster and less invasive.
Tools Required for a Precision Sketch
You don't need expensive software to start your plan. A 100-foot tape measure and a pad of graph paper are the most important tools. We recommend a scale where one square equals one foot for small yards, or five feet for larger properties. Use a compass to draw accurate spray radii for each head location. While digital site surveys like Google Maps provide a helpful starting point, they can't replace physical measuring. On-site measurements account for small elevation changes, hidden utility boxes, and the exact dimensions of your hardscaping that a satellite image might miss.
Essential Site Data: Measuring Water Capacity and Pressure
A professional sprinkler system layout design is only as good as the data supporting it. You cannot determine where to place heads or how to size your pipes without first understanding the mechanical limits of your water supply. Designing a system without these metrics often leads to "weeping" heads that fail to pop up or, conversely, excessive pressure that mists and wastes water. Your design must respect the laws of hydraulics to ensure long term reliability and performance in the Arizona heat.
Two primary numbers dictate your system's capacity: Working Pressure, measured in Pounds per Square Inch (PSI), and Flow Rate, measured in Gallons per Minute (GPM). Your water meter size and the diameter of your service line act as the physical bottlenecks for these values. For instance, a standard 5/8 inch residential meter provides significantly less volume than a 1 inch meter. Elevation also plays a critical role. For every foot of rise in your yard, you lose approximately 0.433 PSI. If your backyard sits higher than your water source, your layout must account for this loss to maintain uniform coverage.
How to Perform a Static Pressure Test
Determining your static pressure is a straightforward process that requires a simple pressure gauge. Attach the gauge to an outdoor hose bib located as close to the main water supply as possible. Ensure no other water is running inside or outside the home during the test. It's wise to take readings during both peak hours, like early morning when neighbors are watering, and off-peak hours. This reveals the "worst case" pressure your system must handle. If your readings consistently exceed 80 PSI, you should install a pressure regulator to protect your valves and pipes from premature wear. If you find these technical requirements confusing, you can consult with a local expert to verify your property's specific needs.
Calculating Your Total Available Flow (GPM)
The flow rate determines how many sprinkler heads you can group onto a single valve. To find this, use a 5-gallon bucket and a stopwatch at your outdoor faucet. Turn the water on fully and time how long it takes to fill the bucket to the top. Use the formula: (Gallons / Seconds) x 60. For example, if a 5-gallon bucket fills in 30 seconds, your flow rate is 10 GPM. However, you should never design a system to use 100% of this capacity. Applying a 25% safety margin is a professional standard; if your test shows 10 GPM, plan your layout using only 7.5 GPM. This buffer accounts for future pressure fluctuations and ensures your system remains functional even during periods of high municipal demand.
Mapping Your Landscape and Establishing Hydrozones
Once you have gathered your pressure and flow data, the next step is applying those metrics to a physical map of your property. A successful sprinkler system layout design is built on the foundation of hydrozoning. This is the strategic practice of grouping plants with identical water requirements into the same irrigation zone. By separating high-water areas from desert-adapted plants, you ensure that every drop of water serves a specific purpose without being wasted on species that don't need it.
Start by creating a scale drawing of your entire landscape on graph paper. You must include all permanent structures, such as your home foundation, driveways, patios, and fences. These hardscapes are boundaries that your spray patterns should never cross. In our desert environment, you also have to account for microclimates. A south-facing wall will radiate intense heat and dry out the soil rapidly, while a north-facing area might remain shaded and cool for most of the day. Your layout should reflect these differences by placing sun-baked areas on separate zones from shaded ones.
In Arizona, mixing plant types on a single valve is a recipe for system failure. A lush Bermuda grass lawn requires frequent, shallow watering to stay green. Conversely, desert cacti and succulents thrive on deep, infrequent soakings. If these share a zone, you will either drown your cacti or leave your lawn with dead spots. Separating these needs allows for the precision required to maintain a healthy, durable landscape.
Dividing Your Yard into Logical Zones
Identify your turf areas, planting beds, and large trees as distinct zones. The size of each zone is dictated by the GPM calculations you performed in the previous step. It is vital to stay within your 75% safety margin to ensure every head pops up fully. When planning your valve locations, choose spots that are easily accessible. This makes future wiring and diagnostics much simpler for any technician or homeowner. Grouping valves into a central manifold box is a professional standard that keeps the system organized and protected.
Special Considerations for Desert Landscapes
Arizona soil often contains caliche, a dense layer of calcium carbonate that acts like concrete. This layer leads to slow absorption rates and heavy runoff if water is applied too quickly. Your layout should account for this by utilizing drip systems for native flora. Drip irrigation delivers water directly to the root zone, which drastically reduces evaporation in our 100-degree summers. Finally, plan for the future. A young Palo Verde tree will have a significantly larger canopy in five years. Ensure your design allows for moving or adding emitters as the root system expands outward.
Strategic Head Placement for Uniform Distribution
The most common mistake in a DIY sprinkler system layout design is the assumption that if the water "reaches" a spot, that spot is sufficiently watered. In reality, a single sprinkler head does not distribute water evenly across its entire radius. The application is typically heaviest near the nozzle and tapers off as it reaches the perimeter. To solve this, professionals follow the Golden Rule of Irrigation: head-to-head coverage. This requires a 100% overlap, where the spray from one head reaches exactly to the base of the next one in every direction.
Achieving this level of precision requires calculating the precipitation rate for each zone. This metric, measured in inches per hour, ensures that all plants in a specific area receive moisture at the same speed. You must never mix different head types on the same valve. For example, a fixed spray head applies water much faster than a rotary nozzle. If they share a zone, you'll end up with a swamp in one area and a desert in the other. For narrow side yards or curved borders, specialized strip nozzles and adjustable arc heads are necessary to keep water off your home's foundation while maintaining total coverage.
Square vs. Triangular Spacing Patterns
The geometry of your yard dictates your spacing pattern. Square spacing is the standard for defined, rectangular lawns and small garden boxes. It's easy to map and ensures that corners are adequately covered. However, for large or irregular open spaces, triangular spacing is often superior. By offsetting the rows of heads, you create a more uniform pattern that eliminates "dry shadows" where spray might otherwise be blocked. This staggered approach provides more consistent moisture levels across the turf, which is vital for grass survival during an Arizona heatwave.
Selecting the Right Components for Arizona Heat
Our local environment is notoriously harsh on mechanical systems. When planning your design and installation in Surprise, AZ, high-quality Schedule 40 PVC is essential for the longevity of your mainlines. We also recommend using pressure-regulating heads. These components maintain a consistent 30 to 45 PSI at the nozzle, preventing the fine misting that occurs when pressure is too high. In the desert, mist evaporates before it ever hits the soil. Additionally, if your yard has any slope, ensure your heads have built-in check valves. These prevent "low-head drainage," where water leaks out of the lowest point every time the system shuts off, wasting gallons and creating muddy patches.
If you're unsure which spacing pattern or head type fits your specific landscape, it's a good idea to get a professional consultation to ensure your layout is built to last.
Refining the Layout: Pipe Sizing and Valve Placement
The final phase of a successful sprinkler system layout design involves the plumbing network that connects your water source to the individual heads. While head placement determines coverage, your pipe sizing determines the system's longevity and reliability. We often utilize the "Telescoping" method to maintain a steady pressure balance across the entire yard. This involves using larger pipe diameters for your mainlines and gradually reducing the size for lateral lines as they reach the final heads in a zone. This strategy ensures that the first head and the last head in a circuit receive nearly identical water pressure.
In the Arizona desert, 1-inch PVC is the professional standard for residential mainlines. This size provides a robust volume of water that can withstand the high demand of summer cycles without excessive velocity. When installing these lines, it's critical to place your valves and backflow preventers in locations that allow for easy access. Avoid burying valves in remote corners or under heavy decorative rock. Instead, group them in a valve box near a walkway or driveway. This foresight simplifies future maintenance and protects your home's potable water supply from potential siphoning of irrigation water.
Even though our climate rarely sees deep ground freezes, designing your layout for drainage or a "blow-out" is a wise long-term investment. Installing a manual drain valve at the lowest point of your system allows you to clear the lines for repairs or during rare extreme weather events. This practice prevents stagnant water from sitting in the pipes for months, which can lead to sediment buildup and nozzle clogs.
Minimizing Friction Loss in Your Piping
Every foot of pipe and every fitting you install creates resistance. Friction loss is the energy lost as water moves through a pipe. If your layout includes too many 90-degree elbows or "T" fittings, you'll see a significant drop in pressure by the time the water reaches the sprinkler. To keep the system efficient, use straight runs whenever possible and choose sweeping bends over sharp angles. If a zone is particularly long, you may need to increase the pipe diameter to compensate for the distance, ensuring the heads at the far end still pop up fully.
When to Seek Professional Design Expertise
While many homeowners can handle a basic rectangular lawn, complex landscapes often require a higher level of technical oversight. If your property has significant elevation changes, low municipal water pressure, or requires intricate master valve wiring, a professional sprinkler system layout design becomes a necessity. A well-engineered plan acts as a safeguard against frequent residential irrigation repair needs in the future. Before you hit the dirt with a shovel, review your final map one last time. Ensure your hydrozones are distinct, your head-to-head coverage is 100%, and your valve locations are marked clearly for a lifetime of dependable service.
Securing the Long-Term Health of Your Landscape
A successful sprinkler system layout design is more than just a weekend project; it's a technical commitment to the health of your property. By prioritizing hydraulic precision and establishing clear hydrozones, you ensure that your landscape remains resilient against the harsh Arizona sun. We've explored how gathering accurate site data and planning for 100% head-to-head coverage eliminates the waste and dry spots that often plague residential systems.
If the technical math of flow rates or the complexities of valve wiring feel overwhelming, we're here to help. Our family-owned business brings over 25 years of local experience to every project. As licensed experts in wiring, valves, and hydraulics, we specialize in creating desert-optimized systems that stand the test of time. You can Get a Professional Irrigation Design Consultation to ensure your layout is engineered for peak efficiency. Taking the time to plan today results in a more durable, water-wise yard for years to come.
Frequently Asked Questions
What is the most common mistake in sprinkler system layout design?
The most frequent error in sprinkler system layout design is failing to account for the actual flow rate and pressure available. Many homeowners install too many heads on a single valve, which prevents the heads from popping up fully and results in poor coverage. This oversight forces the system to work harder than necessary, leading to premature mechanical wear and persistent dry spots in the lawn.
How far apart should sprinkler heads be placed for a residential yard?
Sprinkler heads should be spaced exactly as far apart as their spray radius, or "throw," allows. If a nozzle is rated for a 15-foot throw, the next head must be placed exactly 15 feet away. This ensures that the spray from one head reaches the base of the next. Proper spacing is the only way to achieve the uniform distribution required for a healthy Arizona landscape.
Can I mix different types of sprinkler heads on the same zone?
You should never mix different head types, such as fixed sprays and rotors, on the same irrigation zone. These components have vastly different precipitation rates, meaning they deliver water at different speeds. Mixing them will inevitably cause some areas to be overwatered while others remain bone dry. It's best to group identical heads together to maintain a balanced application of moisture.
How do I design a layout for a yard with very low water pressure?
Designing for low water pressure requires reducing the number of heads per zone to stay within your available flow rate. You can also utilize high-efficiency rotary nozzles, which operate effectively at lower pressures and apply water more slowly. This approach allows the soil to absorb moisture without runoff, making it an ideal strategy for properties with limited municipal water capacity or long pipe runs.
What is head-to-head coverage and why is it mandatory?
Head-to-head coverage is the 100% overlap of spray patterns between adjacent sprinkler heads. It is mandatory because a single head applies the most water at the midpoint of its throw and very little right at the nozzle. By ensuring the spray of one head reaches the base of another, you fill in these "thin" areas. This results in the uniform moisture levels needed to prevent brown patches.
How do I plan an irrigation layout for a sloped area?
For sloped landscapes, you should place heads closer together and install them on separate zones for the top and bottom of the hill. Water naturally runs downhill, so the bottom area will require less run time than the top. Using heads with built-in check valves is also essential. These prevent water from draining out of the lowest head every time the system shuts off, which avoids muddy spots.
Should I use PVC or poly pipe for my Arizona sprinkler layout?
Schedule 40 PVC is the professional standard for an Arizona sprinkler system layout design due to its superior durability. While poly pipe is common in colder climates for its flexibility, it doesn't withstand the intense desert heat or the abrasive nature of our rocky caliche soil as well as PVC. Rigid PVC provides a more stable, long-term solution for mainlines and lateral lines in our specific environment.
How many zones do I need for a standard quarter-acre lot?
A standard quarter-acre lot typically requires between four and eight zones to function efficiently. The exact number depends on your property's total GPM and the variety of plant life you have. For example, you might need two zones for turf, three for garden beds using drip irrigation, and one specifically for large trees. This separation ensures each area receives the correct amount of water without waste.